Container Gardening for Beginners: Start Your Austin Patio Garden This Week
Container gardening transforms tiny Austin patios, balconies, and doorsteps into productive green spaces without needing a traditional yard. You’ll grow fresh herbs, vegetables, and flowers in pots that fit your available space, whether that’s a sunny apartment balcony or a shaded corner of your deck.
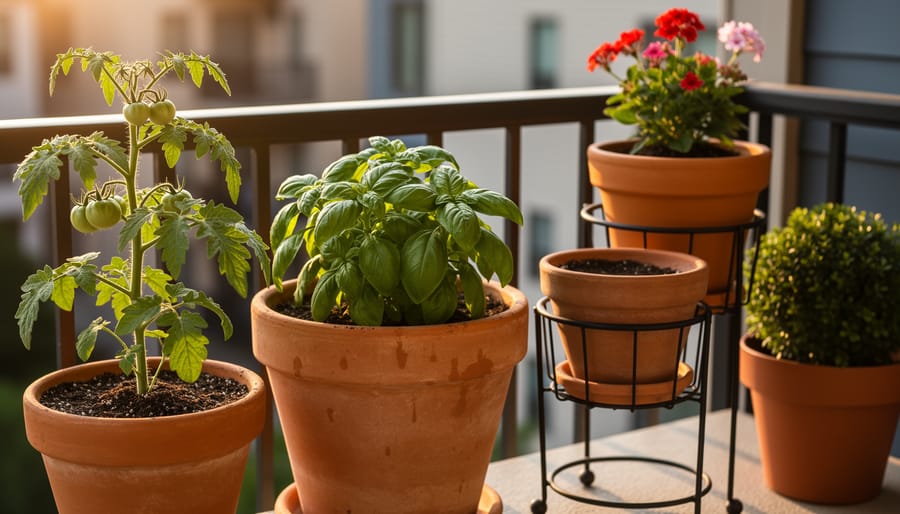
Start with just three to five containers in different sizes. A 14-inch pot works perfectly for tomatoes or peppers, while 6-inch pots handle herbs like basil and cilantro. Grab quality potting mix (never garden soil, which compacts in containers), and you’re already halfway there.
Austin’s intense summer heat actually makes container gardening easier in some ways. You can move pots to shadier spots during our brutal July and August afternoons, something impossible with in-ground beds. Choose heat-loving plants like cherry tomatoes, jalapeños, and Mexican bush sage for summer success, or switch to lettuce and kale when fall arrives.
The real advantage? Containers let you garden vertically when ground space runs out. Stack smaller pots on plant stands, hang baskets from hooks, or arrange tiered shelving to multiply your growing area. This vertical approach turns even the smallest balcony into a surprisingly productive garden.
Watering becomes your main task since containers dry out faster than ground soil, especially in our Texas heat. Check daily by sticking your finger an inch deep. If it feels dry, water thoroughly until it drains from the bottom. That’s the entire learning curve for most beginners.
Why Container Gardening Works Perfectly for Austin Beginners
Austin’s unique combination of rocky limestone soil, intense summer heat, and predominantly urban housing makes container gardening the smartest entry point for beginners. If you’ve ever tried digging into the caliche-heavy ground around here, you know exactly why containers skip that headache entirely, you control the soil from day one.
For apartment dwellers and renters (which describes much of central Austin), containers offer genuine gardening without landlord restrictions or permanent installations. You can start on a balcony, patio, or even a sunny front step, then take everything with you when you move. That mobility matters in a city where the average renter stays two years.
Austin’s climate poses real challenges: triple-digit summers, unpredictable spring freezes, and drought cycles. Containers actually help beginners manage these extremes better than in-ground gardens. You can move pots into shade during July’s worst heat, bring tender plants indoors when a late freeze threatens, and water strategically without fighting compacted soil that sheds moisture.
The learning curve flattens considerably, too. With containers, you’re managing a controlled environment, one pot, one plant, clear results. When something goes wrong, you’re troubleshooting a five-gallon container, not a whole garden bed. Success builds confidence fast.
Limited space stops being a limitation. A 4×6 balcony can hold a dozen productive containers. Vertical arrangements (we’ll cover those later) multiply your growing area without expanding your footprint, perfect for Austin’s space-starved neighborhoods like East Austin or South Congress.
Bottom line: containers eliminate the barriers that stop most Austin beginners before they start. No land required, no soil amendments, no expensive tools, just pots, plants, and a spot that gets some sun.
What You Actually Need to Get Started
Choosing the Right Containers
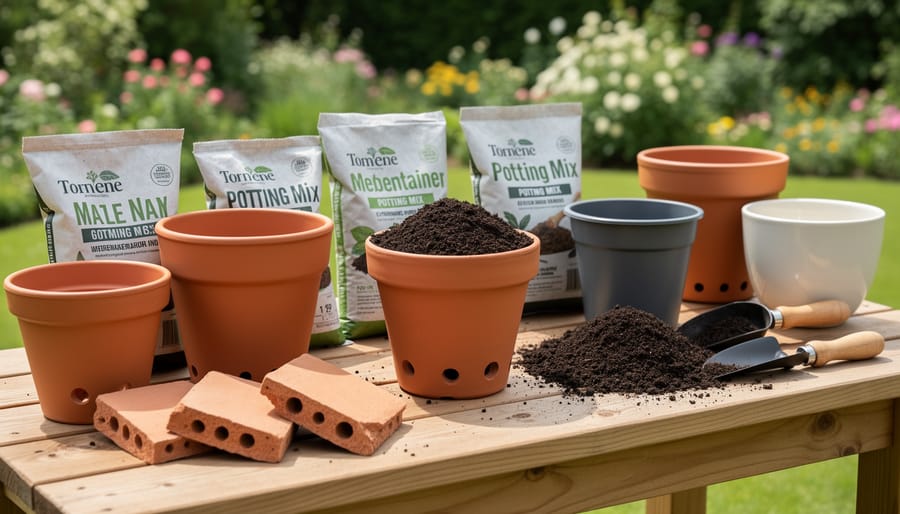
The container itself matters more than most beginners realize. Size is your first decision: herbs need at least 6-8 inches of depth, leafy greens 8-10 inches, and tomatoes or peppers 12-18 inches. A container that’s too shallow forces roots to crowd, which means constant watering and stunted growth.
Drainage holes are critical without them, water pools at the bottom and roots rot within days. If you find a container you love without holes, drill them yourself or use it as an outer decorative pot with a draining liner inside.
Material affects how often you’ll water. Terra cotta looks classic but dries out fast in Austin’s heat, sometimes needing daily watering. Plastic and resin hold moisture longer and work better for busy beginners. Fabric grow bags breathe well and prevent root circling, though they’re less stable on windy balconies.
Start with containers at least 10-12 inches wide. Bigger pots hold more soil, which buffers against drying out and temperature swings, both helpful when you’re learning to read your plants’ needs.
The Soil Mix That Makes Everything Easier
Garden soil seems like the obvious choice, but it’s actually the worst thing you can put in a container. Regular dirt compacts when watered repeatedly, choking out air pockets your plant roots desperately need. Within weeks, you’ll have a dense, waterlogged brick that kills even the toughest plants.
Potting media for containers is specifically engineered to stay loose and fluffy. It’s lighter, drains excess water quickly, yet holds enough moisture so you’re not watering three times a day in Austin’s brutal summer heat. The mix typically contains peat moss or coir, perlite or vermiculite for drainage, and sometimes a bit of compost.
When you’re shopping at Austin garden centers, look for bags labeled “potting mix” or “container mix.” Avoid anything that says “garden soil” or “topsoil.” A quality mix feels light when you pick up the bag and springs back when you squeeze it. Brands like FoxFarm Ocean Forest or Miracle-Gro Potting Mix work well for beginners, but local nurseries often carry their own blends formulated for Central Texas conditions. Expect to pay around $12-$18 for a bag that fills several containers.
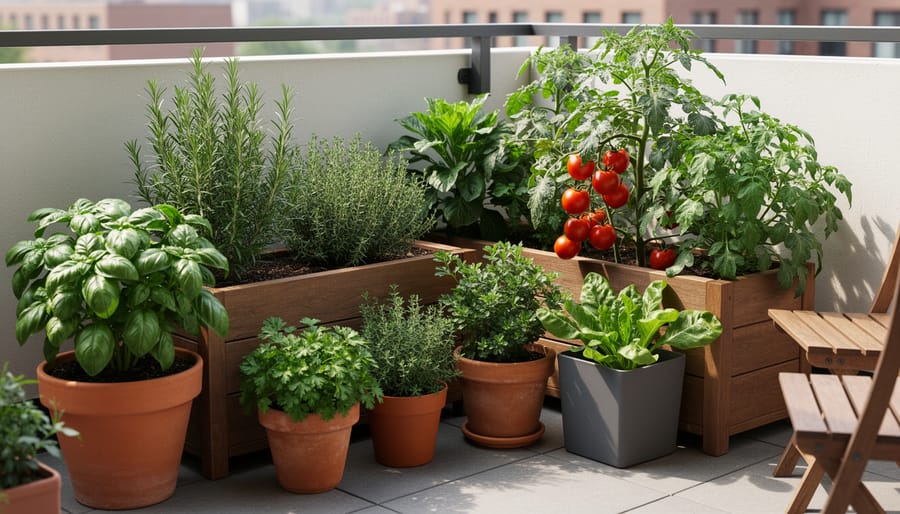
Best Plants for Your First Container Garden in Austin
Herbs That Practically Grow Themselves
Basil thrives in containers with minimal fuss, just give it six hours of sun and consistent moisture. Mint grows so aggressively you’ll actually want it confined to a pot; it tolerates partial shade and forgives occasional neglect. Rosemary handles Austin’s heat like a champ and needs surprisingly little water once established, making it perfect for forgetful beginners. Cilantro prefers cooler months (plant it in fall or early spring), but during those windows it practically explodes in containers. Parsley fills in gaps beautifully and keeps producing if you harvest outer leaves first. Start with these five, and you’ll have fresh herbs for months without drama.
Easy Vegetables for Patio Containers
Cherry tomatoes top the beginner-friendly vegetable list because they produce abundantly in containers and forgive mistakes. Choose compact varieties like ‘Patio Princess’ or ‘Tiny Tim’ for five-gallon pots, and you’ll harvest fruit within 60 days even if you forget to water occasionally. Bell peppers and jalapeños handle Austin’s summer heat beautifully in containers and need less frequent watering than tomatoes, making them perfect for weekday warriors who can’t tend plants daily.
Lettuce and spinach work surprisingly well in shallow containers on shaded patios during Austin’s spring and fall months. Plant them in March or October, give them morning sun only, and you’ll cut fresh salad greens for weeks. Bush beans produce heavily in deep pots without staking, and radishes grow so fast in containers that kids love watching them, sprouting in just three days and ready to harvest in 25.
Low-Maintenance Flowers and Greens
For flowers, zinnias and purslane laugh at Austin’s summer heat and keep blooming without fuss. Zinnias come in bright colors and need only occasional deadheading to look their best. Purslane spreads cheerfully across container edges with tiny blooms in pink, yellow, or orange, and it actually prefers dry conditions between waterings.
Ornamental sweet potato vines add dramatic trailing foliage in chartreuse or deep purple without requiring any bloom care. Dusty miller offers silvery texture that complements other plants and tolerates both heat and neglect. For a pop of color with zero drama, lantana thrives in containers, attracts butterflies, and flowers reliably through Austin’s long summers. All of these handle full sun, forgive missed waterings, and keep your patio looking intentional with minimal effort from you.
Your First Planting: Step-by-Step
You’ve got your container, your potting mix, and your plant. Now comes the fun part, actually putting everything together. This isn’t complicated, and you can’t really mess it up as long as you follow a few basic steps.
Here’s exactly how to plant your first container:
- Check that your container has drainage holes in the bottom. If it doesn’t, drill a few or choose a different pot.
- Fill the container about two-thirds full with fresh potting mix. Don’t pack it down, leave it loose and fluffy.
- Remove your plant gently from its nursery pot by squeezing the sides and tipping it upside down into your hand.
- Loosen the roots slightly with your fingers if they’re circling tightly around the root ball. This helps them spread into the new soil.
- Place the plant in the center of your container so the top of the root ball sits about an inch below the rim.
- Fill in around the plant with more potting mix, gently pressing it down to eliminate air pockets but not compacting it hard.
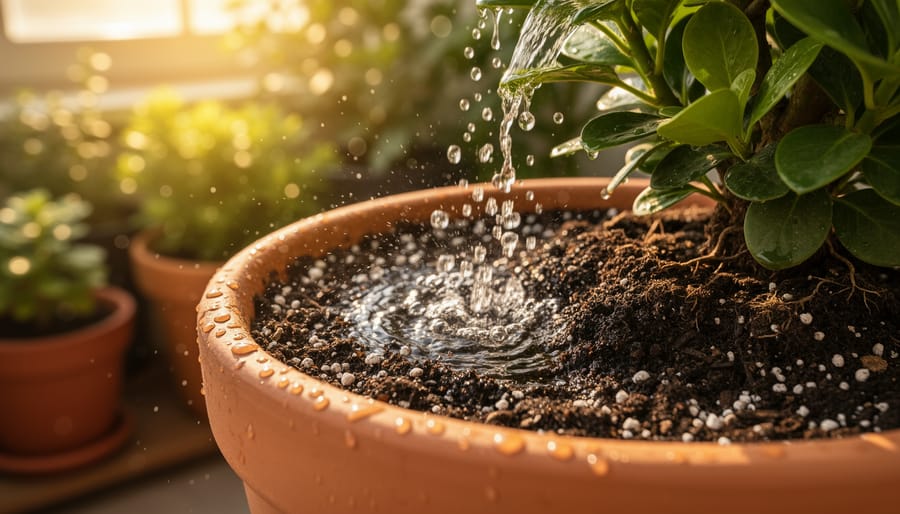
- Water thoroughly until you see water draining from the bottom holes. This settles the soil and gives your plant a good drink.
That’s it. Your container garden is officially planted.
Give the soil surface a light press with your palm to make sure the plant feels stable. If it wobbles, add a bit more mix around the base. The soil will settle slightly over the next few days, which is normal.
After that first watering, place your container in its permanent spot, whether that’s a sunny patio corner or a shaded balcony ledge. Moving a heavy, wet container later is harder than you’d think, so choose wisely now.
For those following organic garden tips you can skip synthetic fertilizers and stick with compost-based potting mixes and organic feeds from the start. Your plants won’t know the difference, and you’ll build healthier soil over time.
The first few days after planting, check the soil moisture daily by sticking your finger an inch deep. You’re learning your plant’s rhythm, and that takes a week or two of paying attention.
Keeping Your Container Garden Alive and Thriving
Watering Without Overdoing It
The difference between thriving plants and dead ones often comes down to watering correctly. In Austin’s brutal summer heat, containers dry out faster than you’d expect, but dumping water on them daily drowns roots just as fast as neglect kills them.
The finger test beats any schedule. Push your finger two inches into the soil, if it feels dry at that depth, water until it runs from the drainage holes. If it’s still moist, wait. During Austin’s peak summer months, you’ll likely water daily or every other day, but spring and fall might need just twice weekly. Morning watering works best since midday evaporation wastes water and evening moisture invites pests.
Containers need deep, thorough watering rather than frequent light sprinkles. When you water, soak the entire root zone until excess drains out the bottom. This flushes salts and encourages roots to grow deep, which helps keep plants alive through Austin’s 100-degree afternoons. If water runs straight through without soaking in, your soil has become hydrophobic, set the pot in a tray of water for 20 minutes to rehydrate it properly.
Simple Feeding Schedule
Container plants eat through nutrients faster than in-ground gardens because every watering leaches minerals from the limited soil. Feed your plants every two weeks during the growing season with a balanced liquid fertilizer diluted to half the package strength. That’s it.
Start fertilizing about a month after planting, once your seedlings have settled in. In Austin’s intense summer heat, your containers dry out quickly and lose nutrients even faster, so consistency matters more than precision. Mix the fertilizer with water in your watering can rather than applying it separately, it saves time and reduces the risk of burning roots.
Stop feeding in late fall when growth naturally slows. Your plants will tell you if they’re hungry: pale leaves, slow growth, or fewer flowers mean it’s time to feed. If they’re thriving, stick with your schedule and don’t overfeed, more fertilizer doesn’t mean bigger plants, just wasted money and potentially damaged roots.
Finding the Right Sunlight Spot
Observe your patio or balcony at different times throughout the day to see where sunlight hits and for how long. Morning sun is gentler, while afternoon sun in Austin can be intense and hot. Full sun means six-plus hours of direct sunlight, partial sun is four to six hours, and shade is less than four. Most vegetables and herbs need full sun, but leafy greens and many flowers do fine with partial sun. If your space only gets morning light or filtered afternoon shade, choose shade-tolerant plants like lettuce, coleus, or begonias instead of fighting your conditions.
Vertical Container Solutions for Tight Spaces
When you’re working with a small balcony or patio, going vertical changes everything. You don’t need more floor space to grow more plants, you just need to think upward.
Stacking containers on tiered plant stands gives you three or four levels of growing space in the same footprint as one pot. These stands work beautifully for herbs and small vegetables, and you can find them at any Austin garden center for $20 to $40. Place taller plants on the bottom tier where they won’t shade shorter ones above.
Wall-mounted planters and hanging containers free up your floor entirely. Attach railing planters to balcony edges for herbs like basil and cilantro, or hang lightweight pots from hooks to grow trailing plants like cherry tomatoes. Just make sure your hanging containers have drainage saucers if they’re over walkways.
Trellises and vertical frames turn climbing plants into living walls. Pole beans, sugar snap peas, and even small cucumbers thrive when grown vertically in containers, and they’re perfect for the Austin gardening zone if you plant them in spring or fall. A simple bamboo trellis costs less than $10 and doubles your growing capacity.
Vertical gardening also improves air circulation around your plants, which helps prevent disease in Austin’s humid summers. Start with one vertical element this week, a tiered stand or a few hanging baskets, and you’ll immediately see how much more you can grow.
Local Resources and Free Learning Opportunities
Austin’s gardening community offers hands-on support that makes starting your container garden much easier. The Texas AgriLife Extension hosts free container gardening workshops throughout the year, and there’s one happening this month on Wednesday, June 17th from 3:00 to 5:00 PM at the Mel Lloyd Centre (167 Centre St, Entrance F). These sessions give you a chance to ask questions and see techniques demonstrated in person, which beats reading alone every time.
For supplies and advice, local spots like The Natural Gardener, Barton Springs Nursery, and Shoal Creek Nursery employ staff who actually garden in Austin’s climate. They can steer you toward plants that work here and away from expensive mistakes. Many community gardens around town, including Sunshine Community Gardens and Zilker Botanical Garden, welcome beginners at volunteer days where you’ll pick up practical skills alongside experienced gardeners.
If you get hooked on container growing, you might eventually want to grow indoors during our cooler months to keep harvesting year-round. The Austin Public Library system also offers free gardening workshops and maintains a solid collection of container gardening books you can check out before buying. Starting with these free and local resources means you’ll have real support as you figure out what works on your own patio.
You don’t need a huge backyard or years of experience to grow your own food and flowers. Container gardening for beginners really is as simple as choosing a few pots, adding quality soil, and starting with easy plants that forgive mistakes. This week, grab a container, pick up some basil or cherry tomatoes, and get your hands dirty. You’ll be surprised how quickly you see results.
If you want hands-on guidance as you start your container garden, Gardens Austin Designers offers personalized consultations and workshops designed specifically for Austin gardeners. Whether you need help choosing the right setup for your balcony or want to learn vertical gardening techniques that maximize your space, our team brings years of local expertise to help you succeed. We make container gardening approachable, fun, and perfectly suited to your unique outdoor space. Start small, start now, and watch your confidence grow along with your plants.